What Causes Media to Go Offline?
Even with the best of media management practices, media can sometimes drop out of site. Generally this is because of one of these issues:
- Missing Drive or Volume – If you regularly edit from external hard drives, it’s possible that the drive you’re looking for isn’t connected to your computer. If on networked storage, it’s possible that you’re not connected to the right network share on the server. And if you’re part of the Dark Side and use a Window’s machine, it’s possible that your media drive mounted under the wrong drive letter.
- Renamed Folders or Changed File Paths – One of the simpler fixes is that a folder along the media’s file path was mistakenly renamed. There’s the chance that the media file itself had a mistaken name change too. Follow the path to your media in Finder or Explorer and confirm everything is where it should be.
- Moved Media – It’s simple to do, especially in a shared work environment, and especially especially (bad grammar, I know) on a networked server. An errant file drag can move a file from its comfy home to a drab folder down the network. A search at the root of where the media lived should help turn it up.
- Deleted Media – !00% the worst-case scenario. There is always the chance media was actually deleted. This is why it pays to have a good ingest workflow that includes having a backup of your media through the project’s end. Without that backup media, you’re now in very hot water.
How to Link Offline Media
Assuming you know where your media is, Adobe Premiere makes the relinking process fairly painless. To fix offline media and relink to the missing media, you’ll need the Link Media window. This window presents itself if you open a project with offline media. It can also be opened if you right click an offline clip in the Project panel and point to “Link Media”.
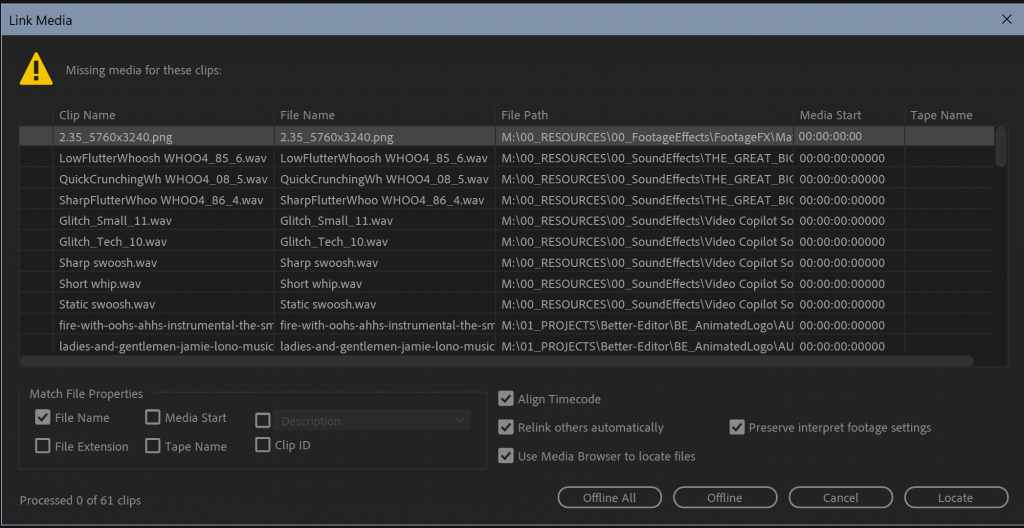
To relink the media, select a file in the window and click the “Locate” button. A media browser window will open and you simply navigate to the missing file. From there Premiere will automatically relink to the other missing media clips it can find. It basses this off of past file paths that the program remembers as well as the parameters selected in the Link Media window.
Parameters Sharameters
Parameters are your best friends in the Link Media window. Looking at the lower portion of the window we can break the parameters into two sections. The options on the right tell Premiere Pro how to relink to the files you find.
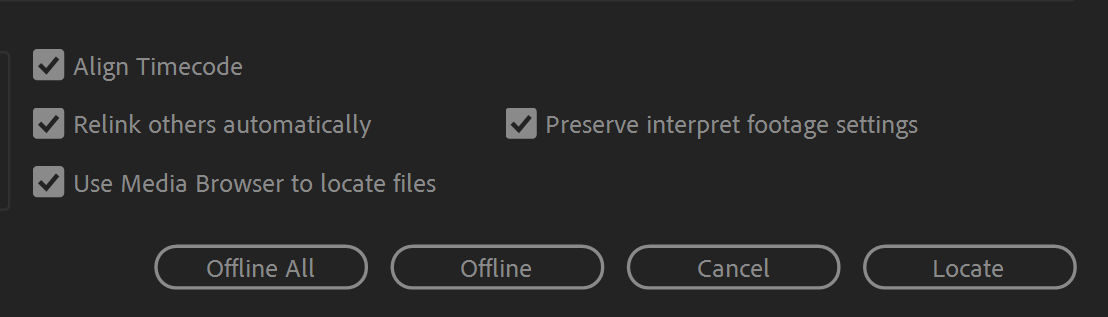
- Align Timecode – Relinks to clip and makes sure the linked clips are timecode accurate. Left unchecked and media can relink to an incorrect clip or show the wrong moment of a correct clip.
- Relink others automatically – this is the magic option. This is the option that relieves immense amounts of manual work and allows Premiere to link to other clips it can find based off previous file paths.
- Use Media Browser to locate files – Enables the Premiere Pro Media Browser for navigating to the missing media
- Preserve interpret footage settings – If in your project you’ve changed footage settings via the interpret footage window, like frame rate or audio channels, this option tells the program to remember those settings.
The options on the left side of the Link Media window tell Premiere what properties to look at to decide whether a clip is a match when relinking automatically.
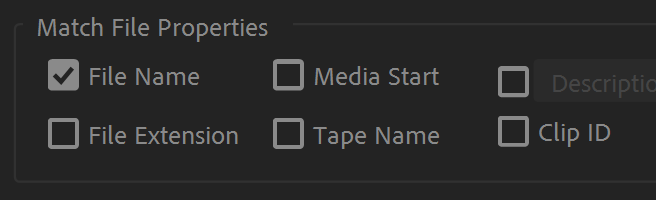
- File Name – My number one option for linking the media and the broadest of the options.
- File Extension – Drills down file name further to help differentiate between fils that may share the same name, but are different formats/codecs. For example, C0004.MP4 may be a flavor of H.264 and C0004.mov could be a Prores file.
- Media Start – Ensures that the media that is linked has the same starting timecode as the offline media.
- Tape Name – Added metadata to a clip helping differentiate it from other clips with the same name and/or extension.
- Clip ID – Similar metadata as the Tape Name.
So like I said in the video, the giant scary red screen is nothing to worry about. With a minor bit of work, you’ll be back to blazing through edits in no time.
Interested in learning how to edit? How about a free course?